Imagine standing on the empty plot of land where your new building will rise. You can almost see it, but the picture in your head is hard to share with others. This is where the power of exterior building rendering comes in. It transforms your blueprints and ideas into a stunning, photorealistic image that everyone can see and understand.
But here’s the challenge: not all visualizations are the same. With different types, styles, and price points, how do you pick the right one? Choosing the wrong type of architectural rendering can lead to wasted time, budget overruns, and a final image that doesn’t meet your needs.
This guide will walk you through the process step-by-step. We will break down the different options in simple terms, helping you make a confident decision that brings your vision to life perfectly.
First, Ask Yourself: What is the Main Goal of This Render?
Before you look at portfolios or get quotes, you need a clear goal. The purpose of your exterior building rendering will dictate almost every other choice you make. Ask yourself these questions:
- Is it for design review? Are you and your architect trying to test different materials or spot potential design flaws?
- Is it for marketing and sales? Do you need to captivate potential buyers or investors before construction begins?
- Is it for official approvals? Do you need to present the project to a planning committee or community board?
- Is it for a fundraising campaign? Do you need compelling visuals to attract funding?
For example, A simple, clear image might be enough for internal design review. But for a high-end sales campaign, you’ll likely need a highly detailed, emotionally charged photorealistic rendering that sells a lifestyle, not just a building.
Understanding the Different Types of Exterior Rendering
Once you know your “why,” you can explore the “what.” Here are the most common types of 3D architectural visualization, each with its own strengths.
1. Static Renderings: The Tried-and-True Workhorse
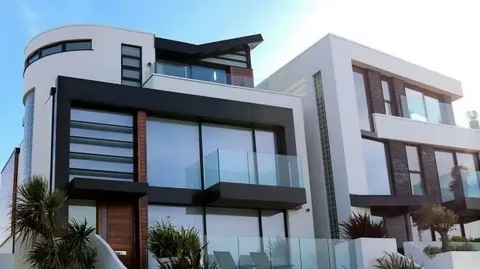
A static rendering is a single, high-quality image from a specific point of view. It’s the most common and cost-effective form of exterior building rendering.
- Best for: Design development, material selection, pre-sales, and project approvals.
- Considerations: You are locking in one specific angle. Choosing the right viewpoint—one that shows the building’s most attractive features—is critical.
2. Aerial and Drone View Renderings
This type of rendering provides a top-down perspective, as if taken from an airplane or drone. It shows your building in the context of its entire site and surroundings.
- Best for: Showcasing large projects, illustrating the relationship between the building and its landscape, and for urban planning proposals.
- Considerations: Essential for any project where the site plan is as important as the building itself.
3. 360-Degree Panoramic Renderings
Imagine a virtual tour for a building that doesn’t exist yet. A 360 render allows a viewer to stand at a single point and look in every direction—up, down, and all around—by dragging their mouse or moving their phone.
- Best for: Creating interactive experiences on websites, for virtual reality (VR) presentations, and giving a more immersive sense of space than a static image.
- Considerations: More engaging than a static image, but still focused on a single location.
4. Architectural Animations (Walkthroughs and Flythroughs)
This is the most advanced form of 3D rendering services. It’s a video that takes the viewer on a dynamic path. A walkthrough simulates a person’s ground-level view, while a flythrough offers a movie-like tour from the air.
- Best for: High-impact marketing launches, investor presentations, and public displays where you need to tell a compelling story about the project.
- Considerations: This is the most expensive and time-consuming option, but it also creates the strongest emotional connection.
A Step-by-Step Guide to Making Your Choice
Now, let’s combine your goal with the rendering types. Follow this simple, four-step framework.
Step 1: Match the Render Type to Your Project’s Scope and Budget
Your budget is a practical reality. Aligning it with your project’s scope will narrow your options quickly.
- For Tight Budgets or Early Design Stages: Start with one or two static renderings. This is a low-risk way to visualize the design and get everyone on the same page. You can always add more visuals later.
- For Medium-Sized Projects or Marketing Launches: A combination of a few static views and one aerial view is a powerful package. It covers the key angles and provides important context.
- For Large-Scale or High-Stakes Projects: If the project’s success hinges on its visual impact, invest in an architectural animation. The cost is higher, but the return on investment for winning over a city council or securing pre-sales can be immense.
Remember: The cost of CGI for architecture is tied to the time an artist spends. More complex scenes, higher detail, and animation all require more hours.
Step 2: Define the Artistic Style and Level of Detail
Exterior building rendering isn’t one-size-fits-all aesthetically. Discuss the desired style with your visualization team.
- Photorealistic: The goal is to create an image indistinguishable from a photograph. This includes realistic lighting, textures, people, cars, and landscaping. It’s ideal for most real estate rendering and marketing.
- Non-Photorealistic: This includes styles like conceptual sketches, watercolor effects, or simple, clean “white model” renders. These are excellent for early design phases where the focus is on form and massing rather than materials.
- Time of Day: The lighting for a sunny midday will look very different from a warm sunset or a moody twilight scene. The time of day sets the emotional tone. A residential project might look cozier at dusk with interior lights on, while a corporate building might look powerful and crisp at noon.
Step 3: Find the Right 3D Rendering Partner
The quality of your final render depends entirely on the skill of the artists. You’re not just buying software; you’re buying expertise.
- Review Their Portfolio Thoroughly: This is the most important step. Look for a style that matches what you envision. Check for consistency, attention to detail, and realistic lighting in their work. Does their portfolio show experience with your project type?
- Understand Their Process and Communication: A good 3D rendering services company will have a clear, step-by-step process. How do they gather information? How many rounds of revisions are included? Is the communication prompt and clear? You want a partner, not just a vendor.
- Get a Detailed Quote: The quote should break down the cost per view, the scope of work, the delivery timeline, and the revision policy. Avoid vague estimates.
Step 4: Prepare Your Materials for a Smooth Process
To get the best results, you need to provide your visualization team with a strong foundation. Good input leads to good output.
Gather and provide:
- Architectural Drawings: Clean and detailed floor plans, elevations, and site plans (in PDF or DWG format).
- Material Selections: Photos, samples, or links to the specific bricks, sidings, roofing, glass, and other materials you plan to use.
- Inspirational Images: Collect pictures of other buildings, landscapes, or even photographs that capture the mood and style you want.
- A Clear Brief: Write down your main goal, the key views you want, and any specific features that must be highlighted.
Conclusion: Your Blueprint for a Successful Visualization
Choosing the right exterior building rendering is a strategic decision. It’s not about picking the most expensive option, but the most effective one for your specific goal, budget, and audience.
By starting with your purpose, understanding the different types of architectural visualization, and carefully selecting a skilled partner, you move from guesswork to confidence. You ensure that the stunning visual you commission will not only look beautiful but will also do its job—whether that’s winning approval, making a sale, or simply perfecting the design of your future building.
Use this guide as your blueprint. With a clear plan, you can harness the full power of 3D architectural visualization to communicate your vision, avoid costly mistakes, and build something amazing.